 |
| Day 11 #momentum challenge |

Monday, November 4, 2013
Momentum Challenge: Create and Share Art
I have been participating (kind of) in a wonderful Momentum Challenge focused on moving your business forward. I say kind of because I have missed a few days! But I plan to do every step of it, just in my own time. That might take away from the whole mission of it but it's just how it has to be. Here is the art I created to share:
I put this together in Photoshop layering textures on the sky and adjusting the colors and transparency until it was just right. The phrase is from a very inspiring conversation with a good friend. It seemed to be just right for this challenge. Hope you enjoy!


Wednesday, October 16, 2013
DIY Leaf Prints
Printing with leaves is easy and fun. You can use almost any kind of leaf or plant but some worked much better than others so be sure to do test prints. The kids went on a scavenger hunt for leaves and grasses to use.
We used acrylic poster paint on white drawing paper. Other ideas would be using newspaper, cereal boxes, old cloth (substitute fabric paint), paper bags, etc.

- Use a wide brush to paint the leaves with a light coat of paint
- Lay them carefully onto the printing surface, paint side down
- Put a piece of lightweight cardboard or folded newspaper over the top of the leaves
- Apply firm pressure—be careful not to shift the leaves or your image might blur
- Remove the top paper and slowly peel leaves up from the printed surface
- Hang to dry

I loved that we could do this outside on a folding table. Very little mess over all and the kids had a great time making these.
For the best results I suggest doing a few practice prints before printing on your final print surface and adjusting the amount of paint to your liking. Too much paint will not produce a crisp image. For a much bolder image, use dark paint on light colored paper. Happy printing!
Monday, October 29, 2012
Words to Inspire
2012 has been challenging. I have found the need for countless reminders and quotes to help me keep focused and energetic and positive. Words can be very powerful. When used in a positive way, they can be just what a person needs to make a change, finish a project, take a chance, maybe even just smile. . . I have been creating mini posters with some great quotes and simple sayings. Here is one of them.

Simple and true. Right click on this image and save it for yourself.

Wednesday, August 29, 2012
Heirloom Tomatoes
I picked several Heirloom tomatoes yesterday. I grew these last year, this year, and will definitely next year. They are delicious and beautiful. I made the mistake of caging them and some are getting squished. All my tomatoes have ripened early this year. Last year I had nothing but green tomatoes in late fall. It's amazing how different each year is!
These are Livingston Seed Co. Old German Tomatoes, the beefsteak variety. They are very dense and AWESOME! I like to slice them thickly and slide an egg, sunny-side up, on top. So good!


I also grew eggplants this year for the first time. While not as successful as my tomatoes, they've produced a couple fruits. I did have a lot of beetles in my garden in early summer. The eggplants, pumpkins, and squash were beaten up a bit. Below is my first ever photo of an eggplant blossom.

These are Livingston Seed Co. Old German Tomatoes, the beefsteak variety. They are very dense and AWESOME! I like to slice them thickly and slide an egg, sunny-side up, on top. So good!


Tuesday, August 28, 2012
Harvest Time
The garden is going off and I can't keep up. I've got pickles soaking in salt water and a counter full of heirloom tomatoes. I've done two batches of green beans (into the freezer after a good blanching!) and my husband and mother-in-law processed 10 dozen ears of corn. So glad I didn't have to help with that!
This will be the first year I've made pickles from Lemon Cucumbers. They're growing like mad right now, I've let a lot of them get too big. The skin is a little tough but they taste great. And they are an array of beautiful citrus and golden yellows.

 Took a quick drive to Mayflower Lake and cast a few at sunset. The kids ran up and down the pier and managed to catch a pan fish before getting in the water.


This will be the first year I've made pickles from Lemon Cucumbers. They're growing like mad right now, I've let a lot of them get too big. The skin is a little tough but they taste great. And they are an array of beautiful citrus and golden yellows.


Wednesday, June 6, 2012
Burning Cold Beer
A recent birthday present project went very well. It involved my burning tool, wood pieces and a fun font. Take a look!
 I traced and transferred my chosen phrase via pencil rub. Nothing fancy here.
 I traced as carefully as I could finding out those E's are maybe a little too curvaceous.
 Add shading and distressing and a hanger on the back.
Happy Birthday Dad!
He's leaving the less finished one to sit in the sun for a while. We'll see how it looks later on.


Happy Birthday Dad!
He's leaving the less finished one to sit in the sun for a while. We'll see how it looks later on.
Saturday, March 31, 2012
Create a Graphic and Sentimental Piece of Collage Art

I've seen this Helen Keller quote illustrated a lot on Etsy. I decided to do my own version using some of my Alaska papers (guess I hoard paper a bit!) I've got a few Anchorage Weekly's, tourist mags, news articles, etc. etc.
I bought this frame for a poster and it didn't fit so I just used the cardboard backing and placed clippings from some of my fave places while living in Alaska. I used acrylic medium to affix the papers and let dry. I then placed my text and painted it, threw it back in the frame and hung it on the wall. Total time = 2ish hours. It's amazing how much this energized the room.
Supplies needed:
Acrylic Matte Medium
2 Paint brushes (one for matte medium, one for painting)
Fun papers, pictures, etc.
Frame
Cardboard
Acrylic Paint
You could also paint a background and cut out letters and paste on. The next one I do will be on canvas. I think the cardboard will hold up for a while but it did warp a little bit, fyi.
Monday, January 16, 2012
My digital camera review
Ugh, I knew the day would come when my little Sony DSC-W80 would quit me. I complained a lot about my cybershot but now that I'm shopping around, I must admit, it wasn't a bad little camera. Not great in low light, very noisy, but it did take some nice pictures.
I jumped for a Canon DSLR for $350.00. BUT, I got it home and started opening it and realized it was HUGE! Maybe I didn't like photography as much as I thought. I took it back.
Next I grabbed the Canon PowerShot SX150 for $180.00. It was smaller, still a Canon, and reasonably priced. The pictures it captured were nice, very nice really. BUT it runs on two AA batteries which lasted for maybe fifty shots. It has a manual flash that is anything but convenient to open. Extremely slow flash recharge time and its too big for my pocket. (I realized that I need a camera that I can stash in a pocket.) Camera return number 2!
At this point I needed to read some reviews. I wanted a camera that took low noise pictures, even in low light. I wanted it to be small enough to cart around in a pocket if needed, and it needed to be fast! I've got two preschoolers for goodness sake!
My top 3 picks were:
Sony HX9V
Canon SX230HS
Nikon Coolpix S9100
I passed on the Sony because I've had two break on me now. They were decent cameras but even though they boast their Carl Zeiss lens, that is what stopped working.
Honestly I wanted to buy the Canon, but no one local has them in stock (and I want it now). Apparently they are popular for some reason. ugh.
I bought the Nikon for $199.00 and have been using it for 13 days now. I need to take it back tomorrow if I'm not going to keep it. The pictures are great, its fast and compact, and overall, not bad. However! When I review my pictures the lens stays open and I don't like this. And the delete menu scares me a bit. I almost deleted all the pictures on my camera because the controls are a little too sensitive. I don't know yet. I'm going to sleep on it and decide in the morning.
I jumped for a Canon DSLR for $350.00. BUT, I got it home and started opening it and realized it was HUGE! Maybe I didn't like photography as much as I thought. I took it back.
Next I grabbed the Canon PowerShot SX150 for $180.00. It was smaller, still a Canon, and reasonably priced. The pictures it captured were nice, very nice really. BUT it runs on two AA batteries which lasted for maybe fifty shots. It has a manual flash that is anything but convenient to open. Extremely slow flash recharge time and its too big for my pocket. (I realized that I need a camera that I can stash in a pocket.) Camera return number 2!
At this point I needed to read some reviews. I wanted a camera that took low noise pictures, even in low light. I wanted it to be small enough to cart around in a pocket if needed, and it needed to be fast! I've got two preschoolers for goodness sake!
My top 3 picks were:
Sony HX9V
Canon SX230HS
Nikon Coolpix S9100
I passed on the Sony because I've had two break on me now. They were decent cameras but even though they boast their Carl Zeiss lens, that is what stopped working.
Honestly I wanted to buy the Canon, but no one local has them in stock (and I want it now). Apparently they are popular for some reason. ugh.
I bought the Nikon for $199.00 and have been using it for 13 days now. I need to take it back tomorrow if I'm not going to keep it. The pictures are great, its fast and compact, and overall, not bad. However! When I review my pictures the lens stays open and I don't like this. And the delete menu scares me a bit. I almost deleted all the pictures on my camera because the controls are a little too sensitive. I don't know yet. I'm going to sleep on it and decide in the morning.
Friday, November 18, 2011
Strawberry Shortcake Costume
So I'm a little late but have to share how my kids' Halloween costumes turned out this year. I'm a wee bit cheap when it comes to costumes. The thought of spending so much for a packaged costume that doesn't last bothers me. We did a Black Widow Spider and Strawberry Shortcake. All the pieces came together pretty well but I was most excited about little Shortcake's hat.
I found a cute white hat at Goodwill for a dollar! It was perfect. I bought some pink Rit dye, felt, and ribbon.
We (meaning my mother-in-law) added the green and white polka dot ribbon and a handmade felt strawberry. . .
We had the skirt and tights, bought a pair of hot pink glitter mary jane's. The t-shirt was my very first applique project! If you don't look too close you'll be very impressed.

Black Widow Costume:
This was an old Ninja costume that was never used. I sewed red felt eyes onto his hat (another dollar purchase at Goodwill) and bought some wide black ribbon to make the legs. He didn't get as much recognition as the Shortcake girl, of course, but both stole the show in my world :)
I found a cute white hat at Goodwill for a dollar! It was perfect. I bought some pink Rit dye, felt, and ribbon.
 |
| Thrift hat and Petal Pink dye |
We (meaning my mother-in-law) added the green and white polka dot ribbon and a handmade felt strawberry. . .
 |
| I love pink and green! |

 |
| Halloween Party |
This was an old Ninja costume that was never used. I sewed red felt eyes onto his hat (another dollar purchase at Goodwill) and bought some wide black ribbon to make the legs. He didn't get as much recognition as the Shortcake girl, of course, but both stole the show in my world :)
Wednesday, October 26, 2011
This is me calling myself out!
OK, SERIOUSLY! August! That was my last post. Now I'll say I got lazy over the summer but I've really picked up the pace on my art projects and listings in my Etsy store. Now for a remodel here. Change is in the air!
Come back soon and check it out, seriously!
Come back soon and check it out, seriously!
Tuesday, August 9, 2011
Moab to Colorado
I'm so glad we stayed a little longer in Moab so we could see more of Arches. Definitely worth the trip. I could see a family trip in the future, camping in the park for a few days and then hitting some trails. I burned a back up disc of my photos and inadvertently screwed something up in iPhoto. As soon as I figure that out I'll post pics of Arches. We ran out of time but still managed to get some amazing photos.
Here is one more of Dead Horse Point:
 We took the same route home because I wanted to stop in a couple of mountain towns for photos. Of course it was Sunday so no stores were open. Still got a few interesting photos.

These shelves reminded me of a store in the Pike Place Market in Seattle. Nothing but collectible salt and pepper shakers and figurines. Shelves and shelves of them.
 Quaint local bread store. I couldn't imagine being sandwiched between a mountain and an interstate. This rustic main street is holding on, I'm so glad we stopped.
One more fun stop on the way home, I'll tell you about it next time!
Here is one more of Dead Horse Point:


These shelves reminded me of a store in the Pike Place Market in Seattle. Nothing but collectible salt and pepper shakers and figurines. Shelves and shelves of them.

One more fun stop on the way home, I'll tell you about it next time!
Wednesday, August 3, 2011
On the way to Moab. . .
Had a nice road trip to Moab for the wedding. Made some fun stops on the way. Once I hit Denver it was all new territory for me. I can't believe I've never travelled 70W out of Denver. I've gone north, south, east, but never west. Wow was I missing out! Idaho Springs and Silver Plume gave me many lovely photos. Lots of old buildings, mines, etc. What I really loved though, was getting stranded in Grand Junction for a few extra hours while our vehicle's wheel bearing was replaced. (scary)
Their downtown is adorable. Reminds me of Eugene, Oregon, but on a smaller scale.
Found an awesome little vintage/thrift store down there that I could've spent hours in.
Everything was organized in collections like the teapots above. Kinda wishing I would've grabbed that light blue teapot on the left. Been thinking in reds and blues since the wedding. Here's a group shot of all of us, it was really windy. This is at Dead Horse Point State Park.
Their downtown is adorable. Reminds me of Eugene, Oregon, but on a smaller scale.
Found an awesome little vintage/thrift store down there that I could've spent hours in.
 | |
| A Haggle of Vendors Emporium |
 |
| http://www.utah.com/stateparks/dead_horse.htm |
Tuesday, May 31, 2011
Final Details for Moab
Less than a week until we start driving toward Moab! I still have to make my necklace but I have most details taken care of. My dear seamstress has taken in my dress a bit in hopes of avoiding any 'Marilyn' moments in the wind and I should have a shiny silver bracelet to wear with my necklace if I ever make it back to the post office.
I'm shopping for a new camera for the trip. I've been looking at Nikon, they have a lower priced digital SLR that looks nice. I'm so disappointed with my Sony Cyber-shot DSC-W80. Not the worst camera but it's lower res predecessor was much better. Low light shots are a mess with noise and it's just really inconsistent. Won't be going that route again. Anyways. . .
These are my shoes for the ceremony, not perfectly comfortable but cute with rhinestones:

I'm shopping for a new camera for the trip. I've been looking at Nikon, they have a lower priced digital SLR that looks nice. I'm so disappointed with my Sony Cyber-shot DSC-W80. Not the worst camera but it's lower res predecessor was much better. Low light shots are a mess with noise and it's just really inconsistent. Won't be going that route again. Anyways. . .
These are my shoes for the ceremony, not perfectly comfortable but cute with rhinestones:
Thursday, May 19, 2011
Re-Sizing and Saving Your Photos and Files
Today's post is about pixels and printing and photos. Here is a good practice to make sure you never lose a great photo because you re-sized it too small.
How to Save Your Photos When Editing:
1. Open the photo you want to edit.
2. IMMEDIATELY do a SAVE AS. This makes sure you are now editing a new version of the photo and any changes you make will not effect the original. You always want to keep the original as it was. Go to the 'File' menu and select 'Save As' .
 3. Choose a name that briefly describes your photo and select where to save it on your computer.

4. Now your original is safe in case there is an "Oh no!" during editing. (Of course you should also back up your photos from time to time!)
Good Info/Rules About Sizing:
1. If you are using your photo on the web or via email the file can be much smaller than if you want to print it. Smaller means less pixels. When I email photos I keep them around 400px (pixels) X 700px, at 72dpi (dots per inch)–100dpi: this gives the viewer a nice size to look at on their computer, it will send quickly, and it won't be high resolution for printing (if you don't want it copied). The file size shouldn't be too big (200KB a little more a little less).
2. If you are going to print the photo then you want a resolution of 300dpi (a lot more pixels!). This is important. Web sized photos are 72dpi, they don't print clear or large. They look nice on the screen but don't be fooled they won't print nice.
3. This is important!!! Once you take out pixels, they can't be replaced! Let me repeat, once you take the pixels out (make the picture smaller in size, like for the web) you can not get those pixels back or put them back into the picture. That is why you ALWAYS do a 'Save As'.
Is this helpful? Let me know, it's the first post like this, of many more to come. Coming up. . . Re-sizing Options.
Send questions my way too, I'm happy to help!
~Colette
p.s.
Funny (not so funny) story. . . my first digital camera was a whopping 1.3 megapixels! I spent over $400 on it back in 2000-ish. And, of course, I knew nothing of resolution at the time, being a new graphic design student. So at least a couple years worth of photos are only viewable on a computer screen. If I print them they are approximately 1.5 inches in size. Luckily for me, I had a film SLR camera, so not all memories were lost.
How to Save Your Photos When Editing:
1. Open the photo you want to edit.
2. IMMEDIATELY do a SAVE AS. This makes sure you are now editing a new version of the photo and any changes you make will not effect the original. You always want to keep the original as it was. Go to the 'File' menu and select 'Save As' .


4. Now your original is safe in case there is an "Oh no!" during editing. (Of course you should also back up your photos from time to time!)
Good Info/Rules About Sizing:
1. If you are using your photo on the web or via email the file can be much smaller than if you want to print it. Smaller means less pixels. When I email photos I keep them around 400px (pixels) X 700px, at 72dpi (dots per inch)–100dpi: this gives the viewer a nice size to look at on their computer, it will send quickly, and it won't be high resolution for printing (if you don't want it copied). The file size shouldn't be too big (200KB a little more a little less).
2. If you are going to print the photo then you want a resolution of 300dpi (a lot more pixels!). This is important. Web sized photos are 72dpi, they don't print clear or large. They look nice on the screen but don't be fooled they won't print nice.
3. This is important!!! Once you take out pixels, they can't be replaced! Let me repeat, once you take the pixels out (make the picture smaller in size, like for the web) you can not get those pixels back or put them back into the picture. That is why you ALWAYS do a 'Save As'.
Is this helpful? Let me know, it's the first post like this, of many more to come. Coming up. . . Re-sizing Options.
Send questions my way too, I'm happy to help!
~Colette
p.s.
Funny (not so funny) story. . . my first digital camera was a whopping 1.3 megapixels! I spent over $400 on it back in 2000-ish. And, of course, I knew nothing of resolution at the time, being a new graphic design student. So at least a couple years worth of photos are only viewable on a computer screen. If I print them they are approximately 1.5 inches in size. Luckily for me, I had a film SLR camera, so not all memories were lost.
Saturday, May 7, 2011
New banner for blog
SO this is not exactly what I had pictured and I am still working on some other versions. . . what do you think? I just couldn't look at my sloppy place holder any more.
I also want to create my own background and get rid of the dull gray. I like gray a lot but it's too dark for me :)
I also want to create my own background and get rid of the dull gray. I like gray a lot but it's too dark for me :)
Tuesday, May 3, 2011
New earrings in Hematite and Turquoise Blues
I took so many pictures and had such high aspirations, however, only 2 pair of earrings have been listed. I'm too tired, I'll admit it. I just woke up in my daughter's bedroom, apparently the chair was comfortable enough for me to sleep in. Yawn! Time to go to bed. Here's the two pair I listed:
I really like this design. Look for more like these but different colors!
 |
| Turquoise Blues Dangle Earrings on Etsy |
 |
| Stacked Hematite Dangle Earrings on Etsy |
I really like this design. Look for more like these but different colors!
Saturday, April 30, 2011
Vintage Ring-A-Dings brochure c.1973
I love finding interesting, graphic, funny, and informative vintage papers. Here's a Ring-A-Ding Ringcraft brochure from the seventies. Some great retro crafts for some brave soul to modernize!

 "Crafts that built America strong are popular as Hobby Craft today. You can do your creative "thing" with Gould's idea rings"
My personal favorite is the pipe holder for the prince in your life–Kate, take notice.
I do really like the mobile idea, I've been wanting to create a mobile for each of my children's rooms and haven't done it yet. I was thinking more like butterflies and airplanes.
Check back for the next vintage brochure: ACME Juicerator (seriously!)


My personal favorite is the pipe holder for the prince in your life–Kate, take notice.
I do really like the mobile idea, I've been wanting to create a mobile for each of my children's rooms and haven't done it yet. I was thinking more like butterflies and airplanes.
Check back for the next vintage brochure: ACME Juicerator (seriously!)
Thursday, April 28, 2011
Frisco Texas In All It's Glory!
I need to re-live my warm happy weather days in Frisco. Here's a few pictures to look at. Didn't do the best job on photos this time around. . .

 These were at a park near our hotel in Frisco. There were fountains and stone pathways winding through trees. Cactus, ponds, trees with weird roots, turtles and bulls. My husband noticed the statues were out of proportion and I offered him my "David" statue theory from Art History class. The heads are bigger for the viewer on the ground, so as to make it look more in proportion. He didn't believe me.
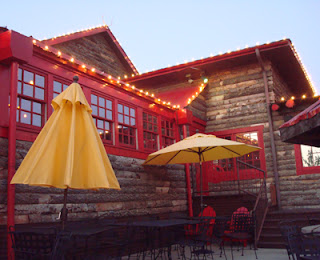 La Hacienda! The BEST EVER EVER fajitas I have EVER EVER had. YUM! And a tall Blood Orange Margarita that wasn't half bad. Living it up sitting in the patio by the fire.

If only I'd had my camera for that Road Runner in the parking lot at the hotel.
 So overall, Frisco seems like a nice place to go if you have a little money to spend. Everyone looked great. Not a shabby car in the lot, or any lot near us. I'll admit, I felt the need to get a hair cut and a new outfit just to hang. Which was a good thing. I needed a little sprucing up and this trip did it for me.
Now, what is this?
 Ok, I know what it is . . .but really?


If only I'd had my camera for that Road Runner in the parking lot at the hotel.

Now, what is this?

Tuesday, April 19, 2011
Craft fair ideas and lessons learned
So like I said yesterday, my truck broke down on the way to my first craft fair. I think it was a blessing in disguise, it kinda took the pressure off. I didn't like setting up late but it gave me a chance to simplify. I took in the basics and got started.
I learned:
1. Price everything ahead of time. (I knew this but ran out of time so I was pricing some things as I set up.)
2. Have a plan of how to set up your display. I took a couple small metal shelves that I spray bombed white to match each other. I only used one and it worked well to add some height to my booth. I didn't know what to expect but everything turned out ok!
3. Don't forget your business cards, receipt book, seller's permit, pens, paper, chairs, sense of humor, etc. And your smile. A few vendors really looked unhappy and I couldn't help avoiding their tables.
4. I was planning on charging sales tax but I didn't find any other vendor that was. SO I didn't. I did think about making a tax chart so I wouldn't have had to use a calculator.
5. I sell jewelry, prints, cards and vintage items. I used my vintage dishes to display my earrings and it worked well and looked nice. I displayed my prints in a vintage file box.


I met some really great people that I hope to keep in contact with. I'm definitely no pro after this first run but I have a better handle on how I want to display my wares next time. And I definitely want to get out there and do it again.
If anyone has any ideas and lessons learned please share!
ps. I have to get some pics of my awesome craft fair barters and purchases. I'll share as soon as I do!
I learned:
1. Price everything ahead of time. (I knew this but ran out of time so I was pricing some things as I set up.)
2. Have a plan of how to set up your display. I took a couple small metal shelves that I spray bombed white to match each other. I only used one and it worked well to add some height to my booth. I didn't know what to expect but everything turned out ok!
3. Don't forget your business cards, receipt book, seller's permit, pens, paper, chairs, sense of humor, etc. And your smile. A few vendors really looked unhappy and I couldn't help avoiding their tables.
4. I was planning on charging sales tax but I didn't find any other vendor that was. SO I didn't. I did think about making a tax chart so I wouldn't have had to use a calculator.
5. I sell jewelry, prints, cards and vintage items. I used my vintage dishes to display my earrings and it worked well and looked nice. I displayed my prints in a vintage file box.


I met some really great people that I hope to keep in contact with. I'm definitely no pro after this first run but I have a better handle on how I want to display my wares next time. And I definitely want to get out there and do it again.
If anyone has any ideas and lessons learned please share!
ps. I have to get some pics of my awesome craft fair barters and purchases. I'll share as soon as I do!
Monday, April 18, 2011
Frisco Texas, I miss you! & Craft fair
Still recovering from my trip to Texas and the craft fair. The VERY warm breezes/winds and super green landscape was a great pick-me-up from my current forever winter in Wisconsin. My first impressions of Texas were highways and shopping. In fact, everything seemed to revolve around shopping. Where I stayed in Frisco was nothing but strip malls and big malls and chain stores, yee haw!
Here's a teaser for my TX pics! More to come. . .
 The craft fair started out a little stressful! Woke up to a half an inch of ice on everything! And then my truck broke down half way there. Luckily I had a cup of coffee and good company to pass the time waiting for our rescue. And, the craft fair peoples still let us set up late and participate.
 Stay tuned for my craft fair summary. . .
Here's a teaser for my TX pics! More to come. . .


Subscribe to:
Posts (Atom)
